Unlocking the Power of Generative AI: A User-Friendly Guide to Building Applications
Generative AI is revolutionizing the tech landscape, making it easier than ever to create human-like text, images, code, and more. While this is exciting, it can be quite a challenge for data scientists to build user interfaces (UIs) and engage effectively with business users. Many data professionals find themselves caught between the intricate world of web development and their expertise in data science and machine learning.
But fear not! Amazon Web Services (AWS) is here to the rescue. With an arsenal of tools and services, AWS simplifies the process of building and deploying generative AI applications, making it accessible even for those who aren’t web development wizards. In this article, we’ll take a look at a practical solution utilizing Streamlit, a Python library tailored for creating interactive data applications, combined with AWS services such as Amazon Elastic Container Service (Amazon ECS), Amazon Cognito, and the AWS Cloud Development Kit (AWS CDK). Together, they empower users to craft seamless generative AI applications with authentication and hassle-free deployment.
A Look Under the Hood: Solution Overview
Imagine deploying a demo application that features a sleek and straightforward UI, designed for interacting with a generative AI model. The clean interface includes a text input area for users to pose their queries and an output section where the results are displayed.
Though the default UI is visually appealing, there’s also the full potential to expand and personalize it to meet specific needs. With Streamlit’s flexibility, you can easily integrate additional features, tweak the styling, and enhance functionality based on your unique use cases.
This solution comprises two key components:
- A Python application utilizing Streamlit for the UI.
- An AWS deployment architecture to securely host and serve the application.
Streamlit allows data scientists to leverage their existing Python skills to craft interactive web applications, eliminating the need for extensive frontend development expertise.
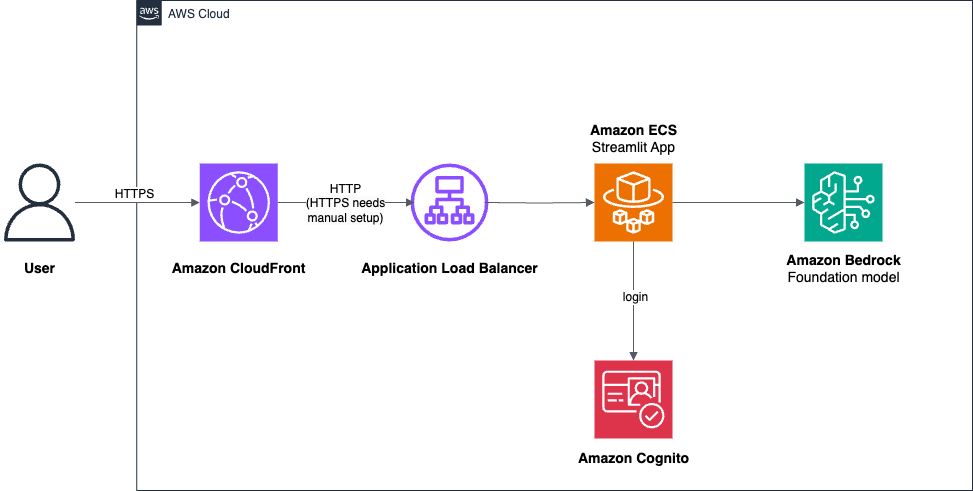
On the AWS side, the deployment architecture ensures that your Python application is publicly accessible for authenticated users. Key components include:
- Amazon ECS and AWS Fargate: Provide serverless orchestration for running your Python application.
- Amazon Cognito: Manages user authentication, ensuring that only authorized individuals can access your application.
- Application Load Balancer (ALB) and Amazon CloudFront: Handle load balancing and content delivery to ensure global availability.
- AWS CDK: Facilitates defining and deploying AWS infrastructure resources using familiar programming languages like Python.
- Amazon Bedrock: Offers access to a selection of high-performing generative AI models via API.
Getting Started: Prerequisites for Deployment
Before diving in, you’ll want to enable model access in Amazon Bedrock and set up your development environment. Whether you’re using Linux, macOS, or Windows, ensure that you prepare accordingly.
To enable access to the desired models, follow these steps:
- Sign in to the AWS Management Console.
- Choose the us-east-1 region.
- Navigate to the Amazon Bedrock console and manage model access.
For a smooth development experience, be sure to have the necessary software and configure the AWS CLI.
Clone and Configure Your Application
Using your terminal, clone the demo application repository:
git clone https://github.com/aws-samples/deploy-streamlit-app.gitEnter the cloned repository and set up a Python virtual environment:
python -m venv .venv
source .venv/bin/activate
pip install -r requirements.txt
Next, configure the Streamlit application by updating the config_file.py to set your stack name and customize security values.
Deploying Your Application
To deploy the AWS CDK template, bootstrap your environment and initiate the deployment:
cdk bootstrap
cdk deploy
After deployment, note the CloudFront distribution URL and Amazon Cognito user pool ID displayed in the output.
Creating Your Amazon Cognito User
Your application is now deployed! Next, create an Amazon Cognito user by heading to the user pool in the Cognito console. This step is essential for authenticating users who will interact with your application.
Accessing Your Streamlit Application
Open your web browser and navigate to the CloudFront distribution URL to log in using the Cognito user credentials. Now, you can explore and interact with your Streamlit app, empowering you to dive deeper into generative AI capabilities.

Customize and Enhance Your Application
The foundational structure offered in the AWS Samples GitHub repository is just the beginning. You can tailor the Streamlit application further to better integrate specific generative AI models or add new features to enrich the user experience.
For example, you might want to modify how users submit queries by adding a button to invoke the AI model rather than having it respond automatically. This flexibility allows for greater user control and engagement.
Testing Locally Before Deployment
Why wait for deployment to test changes? By running the application locally, you can speed up your development process significantly.
Navigate to the docker_app directory and install the required Python dependencies:
pip install -r requirements.txtThen start the Streamlit server to test your app locally:
streamlit run app.py --server.port 8080Conclusion: Making Generative AI Accessible
Who said building user-friendly generative AI applications had to be complicated? With the combined power of Streamlit and AWS services, data scientists can focus on what they do best while delivering secure and scalable applications to business users.
The demo code is readily available in the GitHub repository, providing an excellent launchpad for your own projects. As generative AI adoption continues to surge, the ability to create accessible applications is more important than ever.
The AI Buzz Hub team is excited to see where these breakthroughs take us. Want to stay in the loop on all things AI? Subscribe to our newsletter or share this article with your fellow enthusiasts.


